DIY ID Card Holder

20140724_172604

This lovely little id card holder is self drafted, the vinyl is a bit crooked, which will be fixed in my next version. I plan on testing this pattern more before I put up a tutorial! I also made the lanyard- Following the idea behind the tutorial here: http://twopeasinapoddesigns.com/2010/09/sewing-seeds-with-the-two-peas-a-patchwork-lanyard-tutorial/ – except with one loooooong strip of fabric- and one side using the selvage!

DIY No Slip Socks! – Tutorial!

Now you are guaranteed to see a LOT of little girl projects on this blog, but this can be both boys and a girls project! In this case, Its for a young boy, who is about 6.

I got the idea from this picture found on Pinterest:

It is from Dragonfly designs and can be found here: http://www.twindragonflydesigns.com/2012/02/diy-no-slip-socks.html?m=1

She doesn’t have much of a tutorial, so I made it up as I went, following the basics she gave. I did this at night so pardon the terrible photos once again!

Step 1: Gather Supplies- appropriate sized socks, and puffy paint.

20140717_111743 20140717_111644 20140717_111607

Step 2: Cut out small pieces of cardboard, to simulate feet. I like the idea of using the glue bottle but I wanted more than one at once. Cover the edges of the cardboard with  washi tape, electric tape, or painters tape. the endges should be smooth!

20140717_112452 20140717_112448 20140717_112145

Step 3: put the cardboard in the socks and add designs! Shown here are paw prints, and right and left. But I also did the boy’s name, as well as some squiggles and such. let dry overnight!

20140717_112601 ( Here is the sock before. its on the BOTTOM of the sock!)

20140717_120513 20140717_120511 20140717_114015

Its a good idea the lay the puffy paint on pretty thick, I tried and it flattens down a lot.

Hope you guys find this useful!

Wednesday Wishspiration- Rag Quilt

Hey Everybody! This weeks wishspiration is a rag quilt! I have seen a lot of these made exclusively with flannel, but I have a lot of cotton scraps I want to use. I found this wonderful quilt using jelly rolls on Pinterest.

Fabric Scraps, Tutorial, Quilting for Beginners, Rag Quilt, Jelly Roll

The tutorial and quilt can be found here- http://thecraftyblogstalker.com/tutorial-fabric-strip-rag-quilt/

I love her idea and the colors she chose!

I plan on making my own rag quilt for a baby- smaller and easier! As soon as I get my machine back, I will probably start cutting pieces soon!

Easy Peasy Upcycled Burp Clothes- Tutorial

Can you sew two rectangles, and 9 straight lines? Then you can complete this project. I was rushing to make these before the recipient arrived for brunch, and totally blanked on getting the completed pictures. I made a couple, but only took photographs of a one. I got the idea for the backing of this from Made By Rae. You can find her post here:

http://www.made-by-rae.com/2011/06/best-burp-cloths/

Step 1- Choose fabric (basic calico or quilting cotton) and backing (Pick out an old t-shirt, this one was a child’s medium t-shirt, but any size above that would also work) Flannel can also work, as it is absorbent. I do not like to use fleece and everything just sort of sits on it, and doesn’t get soaked in.

20140706_175149            20140706_175207

Step 2-Cut out your fabrics- My calico was just the right size already- 10×18. Anywhere from 10-15 for the width and 15-20 for the length.Once you have the calico cut out, line it up on your shirt- keep in mind you only need one layer of the shirt, so you can cut it in half if you want. Then cut out the shape of your calico.

20140706_175239

Make sure when you line it up, you don’t include the edging, cut that off once you have cut the rest of it out.

20140706_175325

Step 3- Now you should have two pieces that look like this!

20140706_175257

Step 4- PIN, pin all around.

20140706_175407     20140706_175715

Leave an opening to turn it right side out (like my markers?)

20140706_175851

Step 5-Stitch except for the turn hole, I used about a 1/4 seam allowance. Trim off any excess of either cotton or backing.

20140706_175728

Step 6- Turn, Press, and topstitch, and you have the perfect new fun burp cloth!

Please feel free to comment or ask any questions you may have!


Wednesday Wishspiration!

I’ve decided to add a new weekly feature, since I do this on Pinterest every day anyways. This will be a blog, a pattern, a DIY, or just an idea I would love to make at some point (but don’t have time or just don’t have a reason) and that I WISH I would have thought of. (Get it? Lame I know.) This week, I have a pretty successful and fairly well known blog to put out there. I have been working a lot with baby clothes and items, and shes a huge inspiration to me!

This weeks blog is See Kate Sew! She also makes and sells her own patterns, and just came out with a new line. Her patterns are very nice and easy to follow.

Find See Kate Sew Here: seekatesew.com

Tutorial: DIY Dorm Laundry Bag

AHHH! My first tutorial- with pictures! (admittedly terrible pictures taken with my phone. I have been working off a small chest in out living room- which doesn’t have the best light, and our camera is states away right now!)

Its graduation season, and a lot of my close friends are graduating. I wanted to do something special for each one. Something personal but usable! And low on my basically non-existent budget. In searching pinterest for #DIY grad gifts, I came across a collage, and one of the pictures was an odd tube-like bag for laundry. I was unable to find the website it was from, so I continued looking at bags on pinterest.

I took my inspiration from these two tutorials->

http://georginagiles.wordpress.com/2013/04/13/tutorial-drawstring-bag-2/http://theclassypunk.blogspot.ca/2013/03/tutorial-tuesday-diy-hanging-laundry-bag.html

So here is the hanging dorm laundry bag! My idea behind this was to have it take up as little space as possible, but will be able to hold a lot of clothes- so as clean clothes get taken out of the closet, they get put back in the bag- same amount of space, and the empty bag only takes as much space as a t-shirt

Step 1- pick your fabric! (one of my favorite parts!) I would say you need about a yard in total (I didn’t actually measure it… shhh) I used about 3/4 yd  of the light purple fabric, and about 1/4 yd of the dark purple.

Image

(the color contrast gives this bag a structural look and keeps it from getting too childish looking)

Image

Step 2- attach both fabrics using a 1/4 inch seam allowance- straight stitch the two pieces together

Image

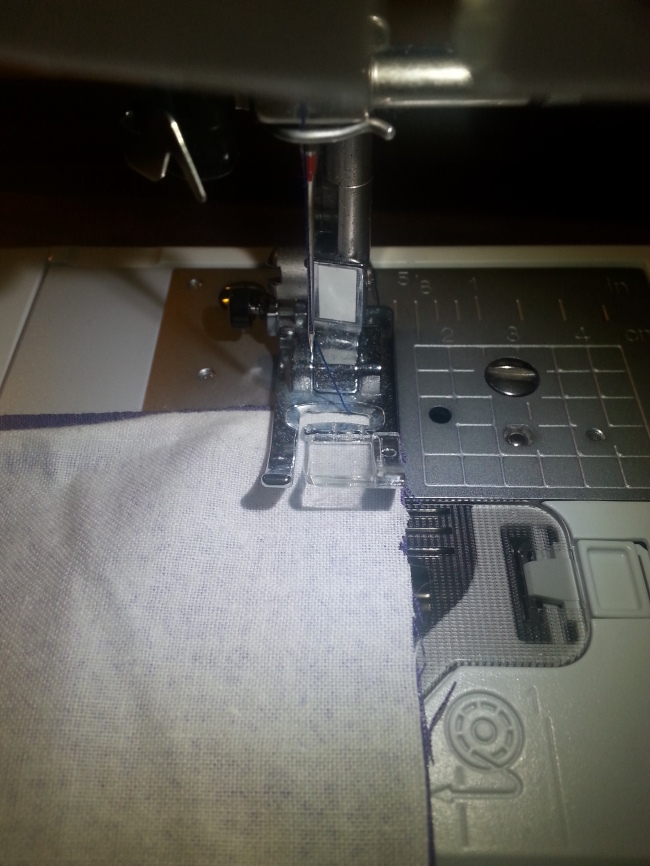
Step 3- trim excess-> as you can see, my light color was larger than the dark, either rotary cut or cut in a straight line or cut at an angle till it evens out

Image

Step 4- Make tube, right sides together, straight stitch down the sides, starting at one end.

Image

Step 5- Make bag –> aka stitch the bottom. For this step, use a 5/8th inch seam allowance. Stitch across, and then INTO the seam allowance, double stitch 1/8th of an inch in. Use pinking sheers on the edge, or serge if you have the option.

Image

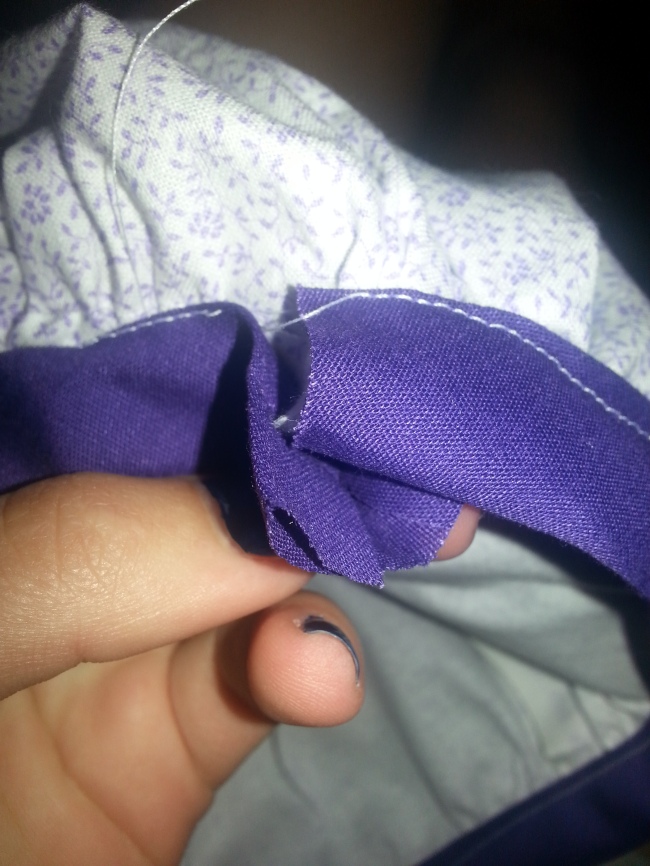
Step 6- This is where I messed up originally, I used bias tape, which I didn’t totally think about.

(I gathered the top of mine first, because I was using a scrap of bias tape, I would NOT recommend doing this! Use enough to go all the way around)

Image

a) Fold under each side of the bias tape, (no picture) simply open the tape, fold up the ends, and continue on. ( I always use double fold)

b) As you sew, make sure the raw edge of the bag in under the bias tape, when you get to the ends, do not sew the ends together/ underneath each other.

Image

Step 7- Using a safety pin, thread a ribbon or soft rope through the bias tape. (you want to thread it on the outside of the bag edge on the inside of the bias tape)

Image

Step 8- Add a letter or other applique. I simply cut out a letter and zigzagged it onto the contrasting bottom. It adds a great personal touch. I added mine to the “middle” of the bag, but in others I’ve made, they have been on the sides.

Image

Step 9- Add buttonhole! Put the buttonhole on the top, on the back side (not with the applique), in the estimated middle. This should NOT be where the drawstring comes out! It should be about the size of a dress shirt button hole.

Image

Step 10- Hang on the hanger and gift!

Image

The Ultimate Adventures of the Teenage Crafter- First Post

^ Well that’s a pretty self explanatory title if I do say so myself. This is my first blog post (YAY!) and I hope to be able to turn this into a legitimate blog over the course of this summer. Although I will be traveling (can you say family road trip?) and moving (gross.) I hope to be able to keep posting. This blog is exactly what it’s titled, all my adventures as I create various things, along with my general adventures in life. I’m 17, going into my SECOND senior year (that’s another story) in all AP classes and freshman geography (yay moving). And I love to sew. I made my prom dress last year, which was probably the largest project I have ever tackled. Most of the sewing things that you will see here will be doll or children’s clothing, and an occasional piece for myself. As for general “crafting” prepare for hot glue. Its my best friend in the whole wide world. (I even used it on the aforementioned prom dress!) I’m a glitter and sparkles kind of girl, (and yes glitter sticks to hot glue even better than Elmer’s!). I recently decorated 3 different graduation caps for my friends and exchange student who all walked in our local graduation. I’m super OCD so projects usually take me a while to fully complete, as I have to go back and TRY to fix everything. That’s my very random schpeel about myself, I hope you enjoy this blog!

-B